With these healthy and portable chocolate breakfast oatmeal cupcakes, you cook just ONCE and get a delicious breakfast for the entire month!


These healthy breakfast cups are great for meal prep!
The original, non-chocolate version of the oatmeal breakfast cupcakes is one of my most popular recipes… maybe even the most popular recipe on my entire website.
It went viral one day about two years ago (such a crazy day when that happened) and has been a huge reader favorite ever since, currently with over 1 million facebook shares and counting!
Here’s The Original Version: Breakfast Oatmeal Cupcakes – Reader Favorite Recipe


I’m not sure why it’s taken me over two years to come out with a chocolate version, but better late than never, right???
These breakfast cupcakes to go are an easy and nutritious recipe loved by both kids and adults.
Just like the original version, they can be vegan, dairy-free, gluten-free, oil-free, and even sugar-free.
They are perfect for an on-the-go breakfast or portable snack, and you can customize the basic recipe by adding in whatever you have on hand, such as shredded coconut, chopped walnuts, or a generous handful of mini chocolate chips!
Also Try These Easy Cinnamon Rolls – Just 4 Ingredients


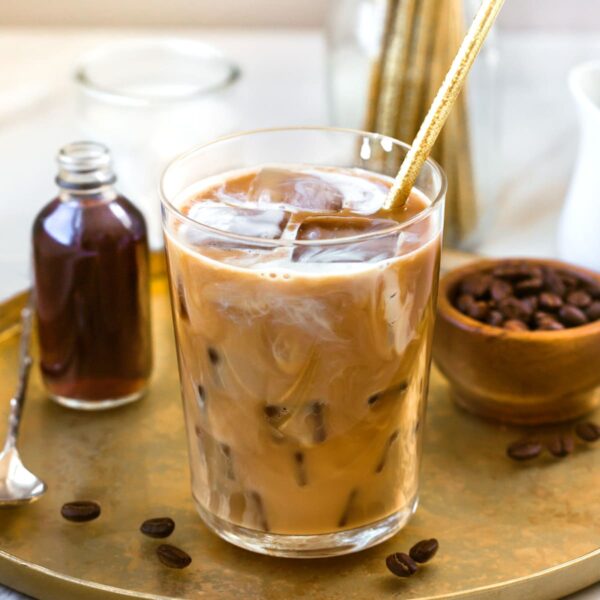
Serve them with a fruit smoothie or this Whipped Coffee Recipe for a quick and easy breakfast.
Leftovers can be stored in the fridge for a few days, or you can also freeze leftover chocolate breakfast oatmeal cups for up to a month, so you’ll always have a healthy breakfast on hand.

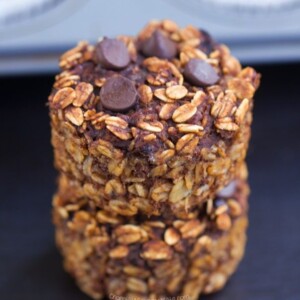
Chocolate Breakfast Oatmeal Cupcakes
Ingredients
- 2 1/2 cups rolled oats
- 1 1/4 cup mashed over-ripe banana (or sub roasted sweet potato)
- 1/4 cup pure maple syrup or honey, or pinch uncut stevia
- 2/3 cup water (and an additional 1/4 cup if using stevia)
- 2 1/2 tbsp oil, nut butter, OR more banana
- 1 1/2 tsp pure vanilla extract
- 1/2 tsp salt
- 1/4 cup cocoa powder
- chocolate chips as desired, and feel free to add nuts or chia seeds, raisins, shredded coconut, etc.
Instructions
- *Feel free to double the recipe! Preheat your oven to 380 F. Line 11-12 cupcake tins. In a large bowl, mix together all dry ingredients. In a separate bowl, whisk together all wet (including banana). Stir wet into dry, then pour into the liners. Bake 21 minutes, then don't open the oven door but turn off the oven and let the cupcakes sit in the closed oven an additional 10 minutes. Let cool – If you don't eat the cupcakes until the next day, the flavor will intensify and the liners will also peel off much more easily. Store leftovers in the fridge for up to a week, or freeze for up to 2 months.View Nutrition Facts
Notes
More Healthy Breakfast Recipes


Better late than never is right! 😉 I always make the original version and they’re awesome to take to work for the brunch shift, but this chocolate upgrade will make work even more pleasant 🙂 Thank you for sharing Katie!!
Could I sub applesauce or pumpkin purée for the banana? We aren’t fans of them in baked goods in this house but we love oats and these look great!
I have never tried it, but be sure to report back if you experiment!
I did half and half pumpkin & applesauce. Turned out great! I added cinnamon and even a scoop of protein powder.
I’ve enjoyed your original version. I can’t imagine adding chocolate would make these anything more than amazing! 🙂 Thanks for the recipe.
Just watch me eat the whole batch of these cupcakes right after they come out of the oven. I swear, if I make them, that is EXACTLY what will happen.
What is the texture of these? Is it more finger food or do I need some kind of utensil? Thanks!
You definitely don’t need utensils. It is firm like a cupcake. Not really cupcake texture, but cupcake firmness, if that makes sense.
I can’t even keep track of how many baked oatmeal recipes I have on my Blog. I make something similar for the kids and they devour them (me too!!). They’re healthy yet there’s just something so decadent and rich about them!!!
You are a genius. Period. Thank you for your website!
http://www.adventurousappetite.com
so yuuummie!!! Need to try them for breakfast on the go :))
http://thehappyvegangirl.com
Cute! I think they would make a good snack eating them that way
This looks great! All the things i love to eat as breakfast. I have to make this some day
I’ve never tried quick oats, but be sure to report back if you experiment 🙂
Hi Katie, whilst this recipe looks fantastic, I did a quick calculation and I got a calorie count of 112 calories per cupcake (when 12 are made in a batch) and this wasn’t even including chocolate chips!
Are you sure the 84 cal you stated is correct?
Thanks
I got around 90 calories, which is closer to Katie’s, but it depends greatly on the ingredients you use. Here is more about calculations:
https://chocolatecoveredkatie.com/faq-page/recipe-questions-and-troubleshooting/
With no oil it it more like 90 calls or two smart points.
These sound SO good!!
http://www.michellewalker.co.uk
Is there a way to make these a little less banana-y? The banana flavor seems to overwhelm them for my taste.
I haven’t tried it and can’t vouch for the taste, but I know some readers have made them with applesauce.
Cute that you think it is possible to bake and not taste test until the next day! This is literally an impossibility in my world!
Love these! One my new favorites for breakfast.
Made these with quick oats..it turned out moist and not too sweet..yummy! Added chia seeds and raisins too.